This article shows how to install Docker for Windows 10 (and probably 11), and then start a web server in a Docker container.
Install Docker
Visit “https://www.docker.com/products/docker-desktop” and download Docker installer. Start the installation process (you’ll need local admin privileges). During the installation process, the wizard will ask if you want “WSL2” components installed. Select that option. Installing WSL2 requires a reboot. Once installed and rebooted, you should see the Docker icon in your System Tray. The Docker window should open (if not, start Docker manually) and accept the T’s and C’s (if you want). Docker can take a while to start but once started, you should see the standard Docker window. If asked, “skip” the tutorial.
The Docker command line
Open a Command Prompt (cmd) window and type in “docker” and hit Enter. It should show you the standard help output. If so, we’re good. Docker is running. If you get an error, it could be because Docker is still starting. It can take a while. The following commands help along the way:
# List your running containers:
docker ps

# List your running and stopped containers:
docker ps -a

# Delete an existing container by name:
docker rm webserver
Want to know the difference between Docker containers and images? Try these two explanations:
https://phoenixnap.com/kb/docker-image-vs-container
https://www.geeksforgeeks.org/difference-between-docker-image-and-container/
Start a test container
In the CMD window, run the following command:
docker run --name webserver -p 801:80 -d nginx
Docker will go and get the files it needs if it doesn’t already have them. Once done, you should be able to browse to your new web server.
TIP: The command above says to “run (create and start) a new container called webserver listening on the container on port 80 and mapped to your workstation’s port of 801, in detached mode, and using the publicly available nginx image as a base”.
Browse to your new web server
Open a web browser and navigate to the following URL:
http://localhost:801
Why the port 801? And why “localhost”? We mapped the port 80 (on the container) to port 801 (on our workstation). Therefore, to visit the site, we need to browse to our own workstation (localhost) and specify the port. We could have mapped to port 80 on the localhost by issuing the command “docker run –name webserver -p 80:80 -d nginx” but sometimes that port is already taken. In fact, we could run a dozen web server on our workstation by issuing that same command but we need to map the ports different for each container. Otherwise we’d get “port in use” errors:
docker run --name webserver0 -p 801:80 -d nginx
docker run --name webserver1 -p 802:80 -d nginx
docker run --name webserver2 -p 803:80 -d nginx
docker run --name webserver3 -p 804:80 -d nginx
TIP: You can’t have two containers with the same name. Hence the name differences in the examples above.
Customer the web server to server our website
Stop your previously started containers:
# Because we named our container webserver:
docker stop webserver
Create a folder on your workstation’s Desktop called “webserver” and put a file inside that folder called “index.html” with the following content:
This is my own website!
Now we can start a new container with a slightly different command:
docker run --name webservercustom -p 801:80 -d -v C:\Users\MyUser\Desktop\webserver:/usr/share/nginx/html nginx
View your new web server
Like earlier, open a web browser and navigate to the following URL:
http://localhost:801
And you will see your new web site.
PHP and persistent storage
Now we can create a PHP script and place it on that web server (container) and have that script write files to its local disk. Why do this? We can use it to see that files can be written locally, and we can see how that impacts future uses containers. Remove that “index.html” file from your “Desktop\webserver” folder. Create a new file in its place called “index.php” with the following contents:
<?php

$fileNumber = rand(10, 99);
$content = "something";

file_put_contents("./MyFile" . $fileNumber, $content);

echo "I just wrote a file called MyFile" . $fileNumber . " to this container's disk.";

$arrFiles = array();
$objDir = dir("./");

while (false !== ($entry = $objDir->read())) {
echo $entry . "<br>";
}

$objDir->close();
?>
This time we’ll use Apache instead of Nginx because it’s simpler to run Apache with PHP than Nginx and PHP. Notice the path in the container is slightly different because Apache uses a different location to serve content from. We’re also specifying the version of PHP to use.
docker run --name webservercustom -p 801:80 -d -v C:\Users\MyUser\Desktop\webserver:/var/www/html php:8.0-apache
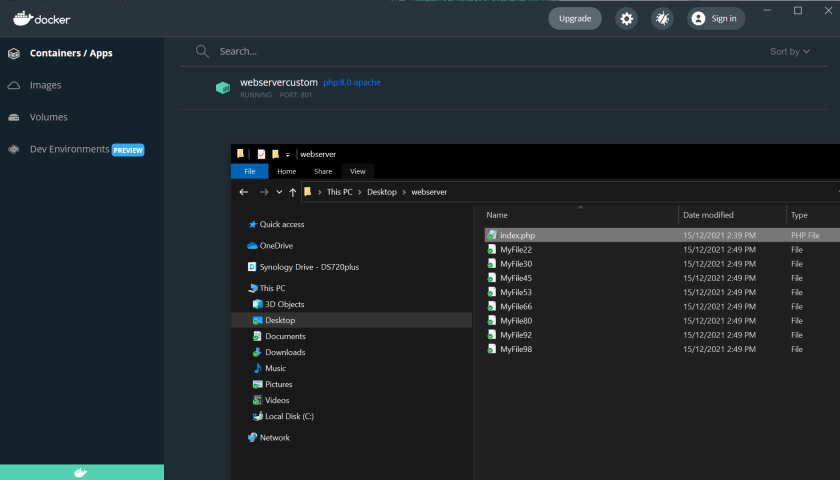
Verify that files are persistent
On your workstation’s desktop, in the folder you created, you will see your “index.php” file as well as the new files that are created each time you visit your new web server. This shows that files exit outside your container. Therefore you can shutdown this Docker container, create a new one and point it to the same local folder and continue from there.
Storing files within the container
So far we’ve stored files outside the container. If we want to store them inside the container but still persistently (they remain even if the container is stopped and restarted).
So we can copy the files in once the container has started – where “webservercustom” is the name of our containter:
cp C:\Users\MyUser\Desktop\webserver\index.php webservercustom :/var/www/html/
Like earlier, open a web browser and navigate to the following URL:
http://localhost:801
Verify that files are persistent – Again
We need to verify the state of our files after we stop the container and start it again. Refresh the web browser page a few times to see the list of files growing. That proves files are there, within the container. Now lets stop and start the container.
docker ps
docker stop webservercustom
docker start webservercustom
Each container (web server within the containers) will show different files. They’re independent. Make a change to the “index.php” file and copy it back in, over the top. Do this one one of the containers to see the effect. It will impact only the container you copy it into, and the other files in that container remain untouched.
