
This article demonstrates how to ensure hosts authenticate before communicating with the Zabbix server and that communications use TLS.
TIP: This setup is based on an “active” monitoring setup. In other words, the Zabbix server doesn’t pro-actively connect to the clients (the servers being monitored) but rather wait for connections from the client. This is required where firewalls and NAT prevent the Zabbix server directly contacting the clients. Also, we’re using port 10051 so change this accordingly.
The instructions found in this article need to be considered for each host that you want to enable PSK and TLS on to communicate with your Zabbix server.
First we need the Zabbix agent installed:
For CentOS/RHEL 7:
rpm -Uvh http://repo.zabbix.com/zabbix/3.4/rhel/7/x86_64/zabbix-release-3.4-2.el7.noarch.rpm
yum install zabbix-agent
systemctl enable zabbix-agent
systemctl start zabbix-agent
For CentOS/RHEL 6:
rpm -Uvh http://repo.zabbix.com/zabbix/3.4/rhel/6/x86_64/zabbix-release-3.4-1.el6.noarch.rpm
yum install zabbix-agent
chkconfig zabbix-agent on
service zabbix-agent start
Tip: If you have trouble starting the Zabbix agent, check if it’s an SELinux issue. You can resolve it pretty quickly using:
grep "zabbix" /var/log/audit/audit.log | audit2allow -M zabbix_agent
semodule -i zabbix_agent.pp
systemctl restart zabbix-agent
The host file “/etc/zabbix/zabbix_agentd.conf” will have the following content when we’re finished. We’ll go through this file as we progress through the process of setting up PSK and TLS with Zabbix. The following is my full “zabbix_agentd.conf” file.
PidFile=/var/run/zabbix/zabbix_agentd.pid
LogFile=/var/log/zabbix/zabbix_agentd.log
LogFileSize=0
Include=/etc/zabbix/zabbix_agentd.d/*.conf
DebugLevel=3
Timeout=3

#The Zabbix server IP address
Server=1.2.3.4
ServerActive=1.2.3.4

#The Zabbix server port number
ListenPort=10051

# This server's hostname as it appears on the Zabbix server
Hostname=this-server.example.local
The above is a fully working “zabbix_agentd.conf” file. I’ve listed it above for reference. Add the following to the “zabbix_agentd.conf” file to enable PSK and TLS. Notice the “PSK001”. We’ll use that later in the Zabbix UI.
# For TLS
TLSConnect=psk
TLSAccept=psk
TLSPSKIdentity=PSK001
TLSPSKFile=/etc/zabbix/zabbix_agentd.psk
Still on the Zabbix client, run the following command to generate the PSK file:
openssl rand -hex 32 | sudo tee /etc/zabbix/zabbix_agentd.psk
The above command outputs a long string. That string needs to be copied and pasted into the Zabbix server UI which we’ll do shortly.
Restart the Zabbix agent on the client:
systemctl restart zabbix-agent
Switch over to the Zabbix server to complete the process. Go to the Zabbix server UI and navigate to “Configuration” and “Hosts”. Click on the host that you’ve just prepared the PSK and TLS on.
Make your settings the same or similar to the following. Obviously set the PSK field to your PSK string. Notice the “PSK001” reference. That is taken from the entry in the “zabbix_agentd.conf” discussed above.
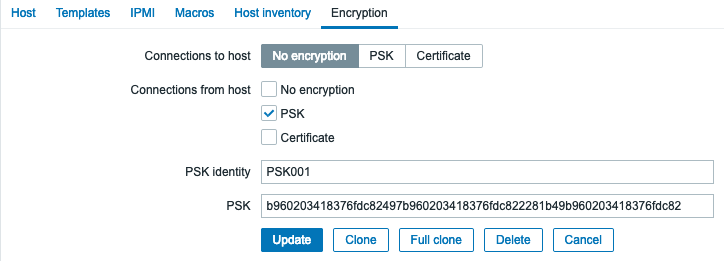
Click the “Update” button and verify that your client and server can still communicate properly.
If you enable debugging to level 5 on the server, you should see entries similar to the following to indicate TLS and PSK are enabled and working:
zbx_psk_server_cb() requested PSK identity "PSK001"
End of zbx_tls_accept():SUCCEED (established TLSv1.2 PSK-AES128-CBC-SHA)
This article was written with the help of “https://linuxize.com/post/how-to-install-and-configure-zabbix-on-centos-7/”.
