
This article shows how to configure pfSense to allow MacOS devices to connect using IPSec (IKEv1). Unfortunately I could not get IKEv2 to work. In this article, we’ll be using a RADIUS server (for authentication). The creation of the RADIUS server is not included in this HowTo but the pfSense settings to use the RADIUS server is included.
Tip: This setup requires no certificates. It does require a shared key to ensure a higher level of security. No addition software is required on the MacOS client.
- The version of pfSense used in this article is “version 2.4.3”.
- The version of MacOS used in this article is “version 10.13.4”.
The following series of screenshots show the settings that i have used to allow a MacOS client to connect to the VPN. When creating the MacOS VPN connection, use the Cisco IPSec option.
Log into your pfSense device and follow the settings as you see them below.
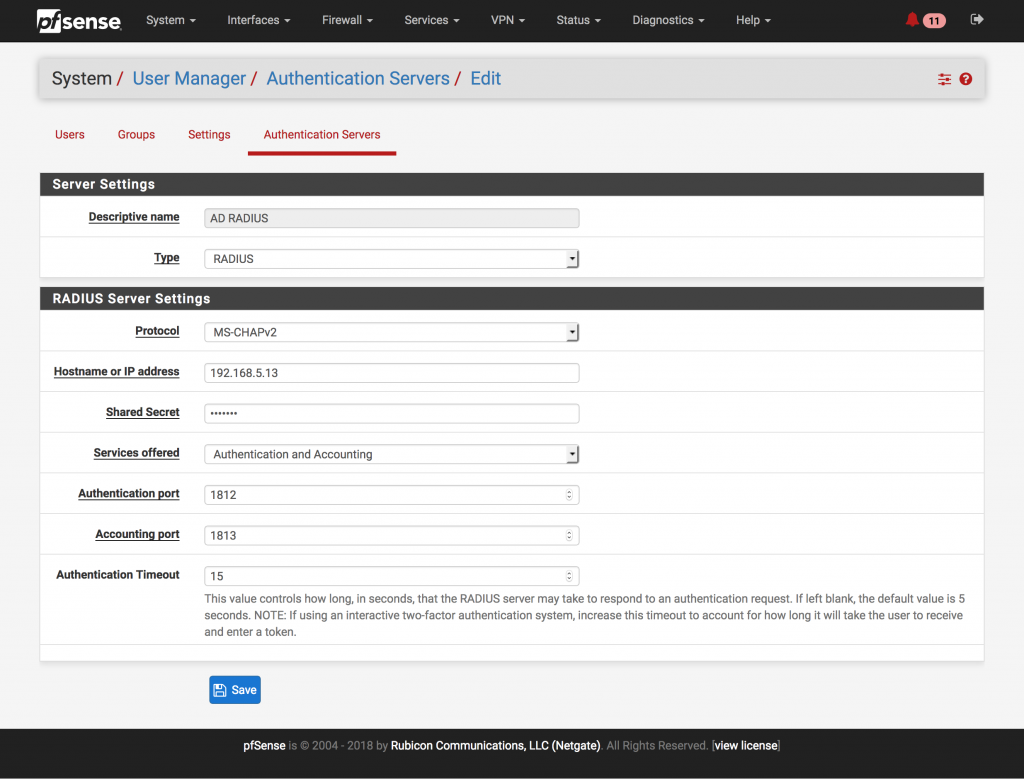
First we need to add a RADIUS server. In my case I’ve used a Windows Server 2016 as the radius server because i wanted Active Directory integration but you can use any RADIUS server.
Go to System -> User Manager -> Authentication Server.
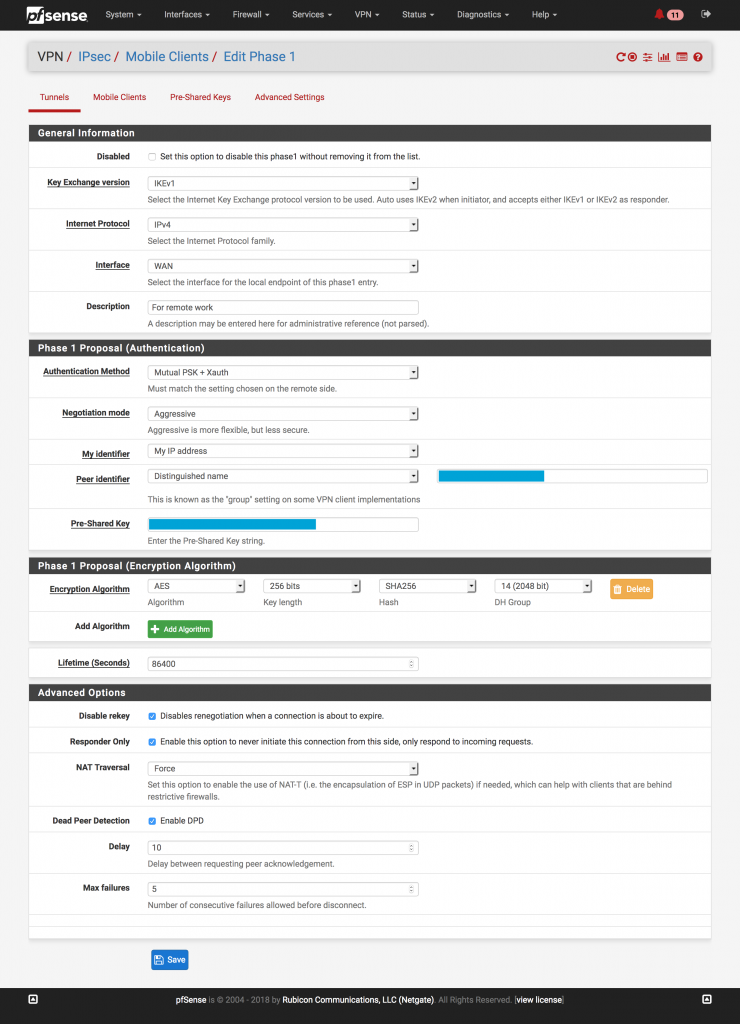
Go to VPN -> IPSec -> Tunnels.
In this section you should click the Add button to add a new VPN. When done, it should look like the following.

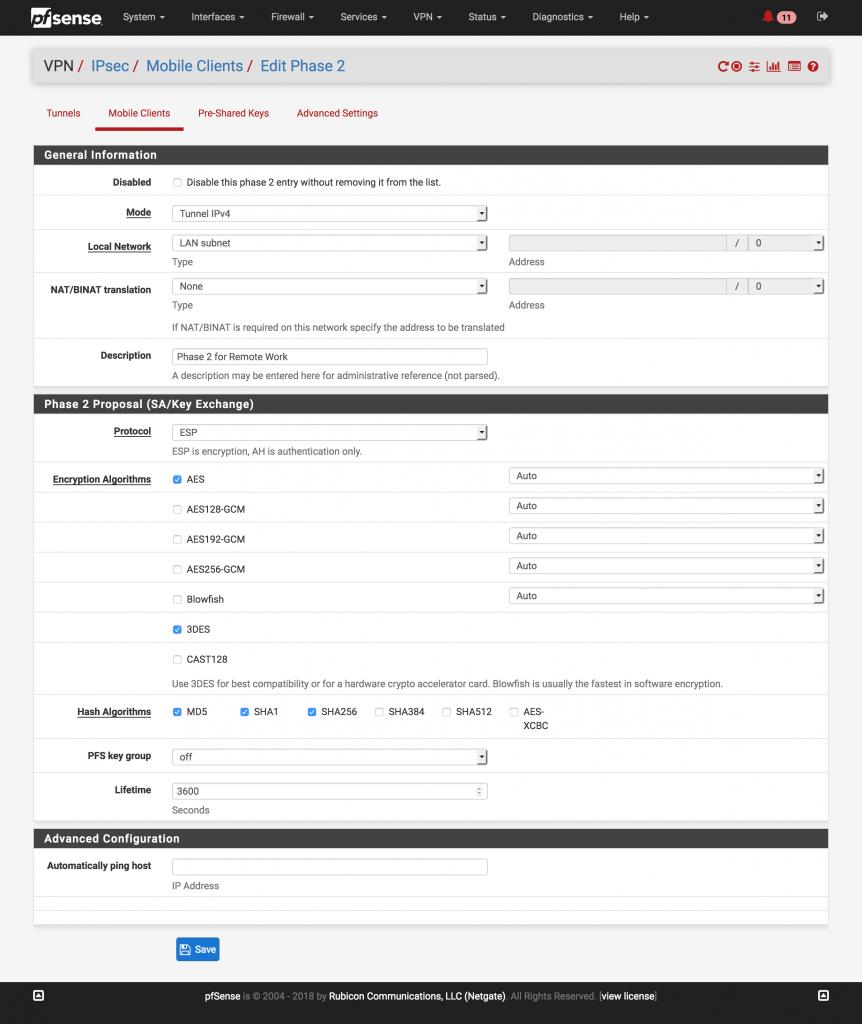
The above shows two editable items; the Phase 1 (the top one) and Phase 2 (the bottom one). Note that “3DES” and “MD5” may be optional. Click the Edit icon next to Phase 1.
Returning to the “Tunnels” section, now edit the Phase 2 item.
Now we need to set the PSK (pre-shared key) also known as the secret.

The PSK in the above screenshot should match the key mentioned in the earlier screenshot.
The next step is to configure the client. In this case it’s a MacOS client:
Go to Preferences -> Network.
- Click the + button to add a new Network Connection.
- In the Interface menu, select VPN.
- In the VPN Type menu, select “Cisco IPSec”.
- In the Service Name, give your VPN connection a name of anything you like.
Now to complete the settings of the new VPN connection. Select the new VPN connection in the left menu.
- In the Server Address field, set the IP or FQDN of the VPN server. This must be the Public IP address.
- In the Account Name field, set your username as it appears on the authentication server (in my case it’s an Active Directory server).
- In the Password field, enter the password as set on the authentication server (in my case it’s an Active Directory server).
- Click the Authentication Settings button.
- In the Shared Secret field, enter the PSK as mentioned in the screenshots above.
- In the Group Name field, enter the Group Name (or Identifier) as mentioned in the screenshots above.
At this point you’re done.
Things to check if it’s not working:
- Make sure firewalls are not in your way.
- Make sure the VPN server (pfSense) can authenticate users against the RADIUS server by going to (on the pfSense device) Diagnostics -> Authentication.
- Make sure the RADIUS server is responding properly, that (if AD) the policies are correct, etc.
- Make sure the PSK or Secret is correct in all places.
I spent most time on the following two components:
- The RADIUS server. This is an Active Directory server in my case and a pain to configure for a Linux System Administrator like myself.
- The Encryption settings in the Phase 1 settings.

Great article.
Saved me!
Just what I needed to know, thank you!
Hi, I have a problem that macbook with osx catalina 10.15.3 not receiving routes to go to internet through vpn.
VPN is working and android phone is working with it perfectly. Any thoughts?
To push all traffic through the VPN tunnel on MAC.
1. Go to the VPN settings
2. Click on options
3. Select “Send all traffic over VPN Connection”
4. Save and log off and back in.